How to create a simple 3D text effect-Part 1
26
Sep'11
Member since:
Sep 2010
Hello,
I know that Halloween is not here yet, but maybe you want to make some creepy cards in the future or whatever you want. So, here's a simple 3D text effect tutorial for all the beginners out there.
Download some of the elements:
http://www.fontex.org/download/Lato.ttf
http://www.fontriver.com/font/vampyr_bats
http://www.dafont.com/creepsville.font
Enjoy!
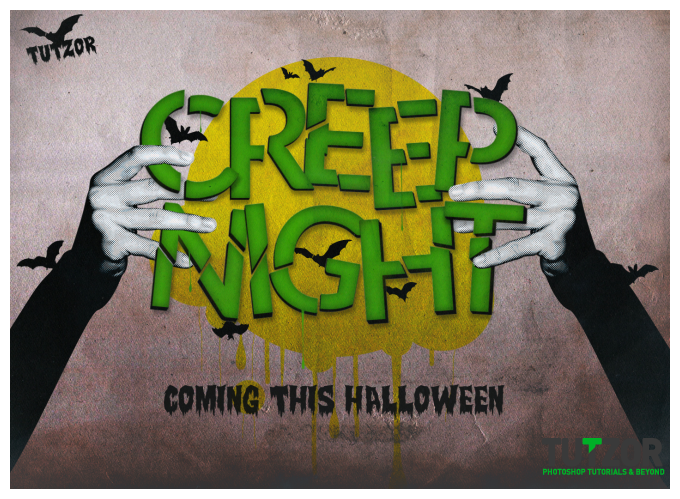
Final Image
Step
01
Member since:
Sep 2010
Open a new file with width 1600 and height 1200.
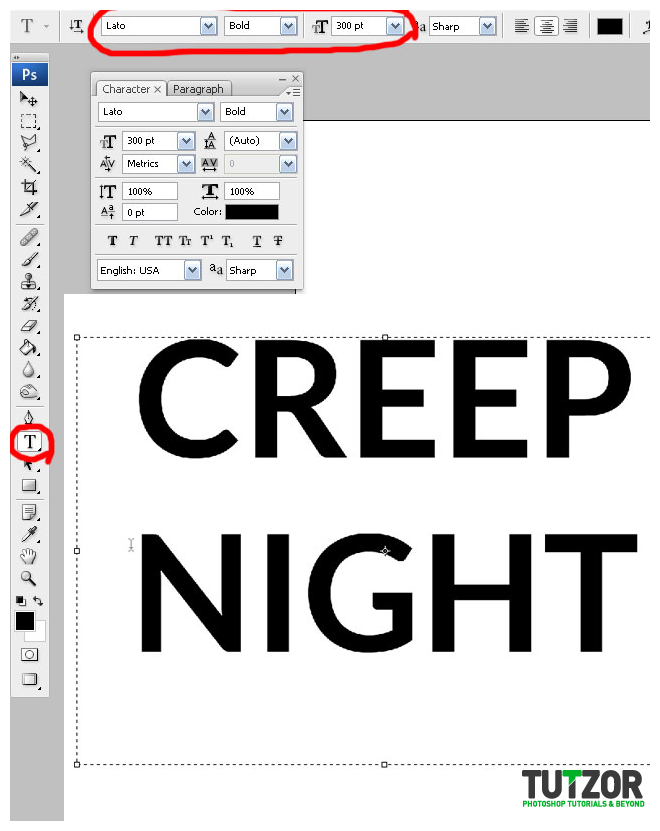
For now leave the background white. and select the Horizontal Type Tool (T).
Choose Lato font, and use the same options as I did to create your text.

Step
02
Member since:
Sep 2010
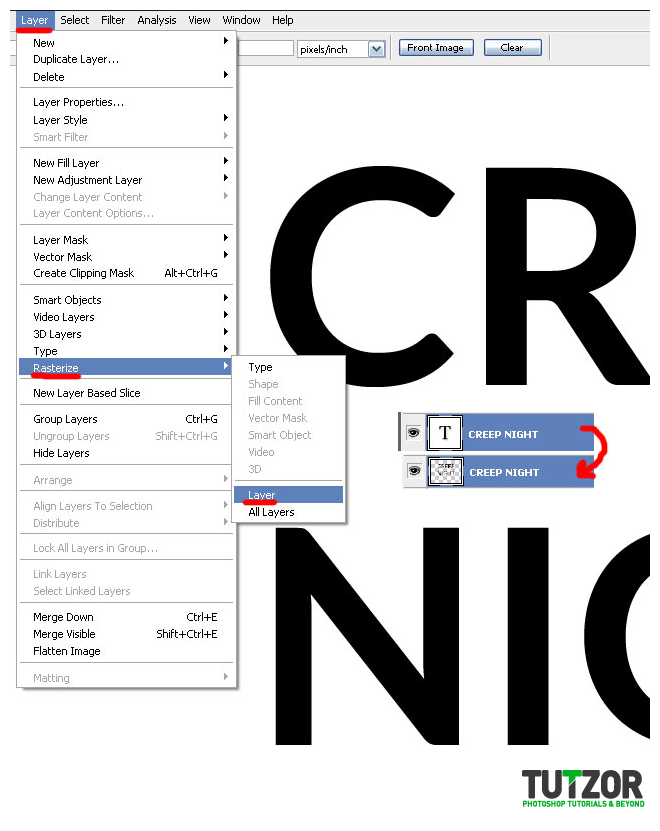
After you’re done with that, resterize the text layer like I did.
Now you have a resterized layer called CREEP NIGHT.
we will be working on this layer for now.

Step
03
Member since:
Sep 2010
We will take each letter individually and damage it a bit to give it a nice look.
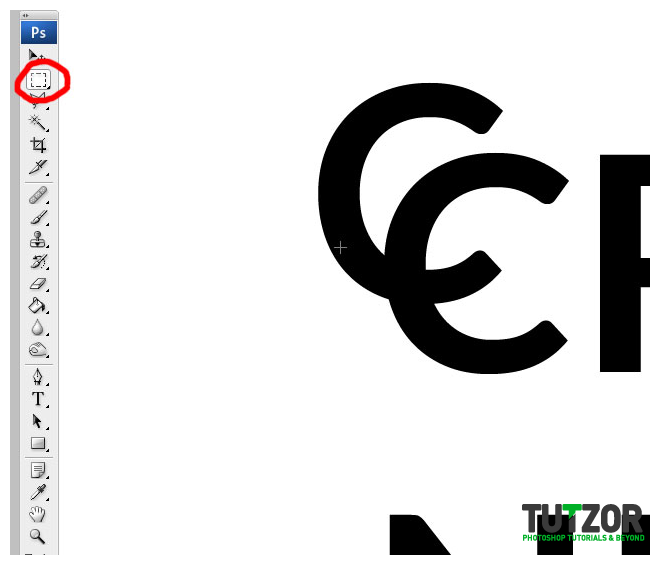
Use the Rectengular Marquee Tool ( M ) and select the C letter. then click Ctrl-C to copy and Ctrl-V to paste it . This will create a new layer just call it C. You can either copy each letter individually now, or just hide the Creep Night layer ,and get back to it when we start working on the other letters.

Step
04
Member since:
Sep 2010
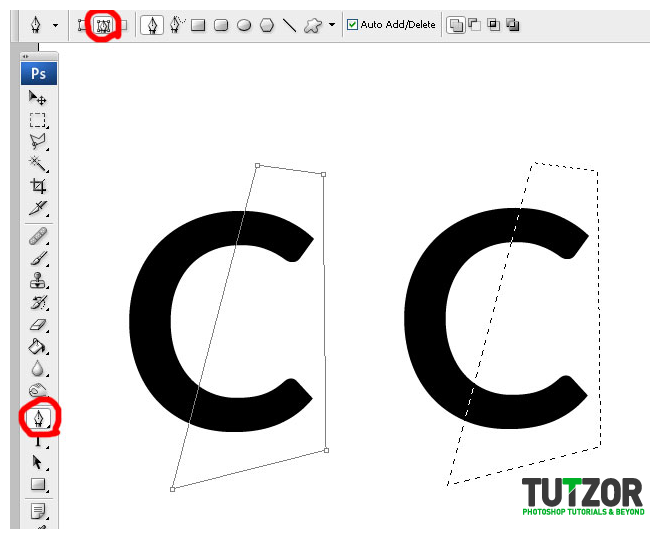
Make sure the C layer is selected, and then select the Pen Tool ( P ).
With the pen tool create a path on the C letter. After that right click on the path Make Selection and make sure the Radius is set to 0% ( Anti-Aliased should be selected ). Then hit Ok.

Step
05
Member since:
Sep 2010
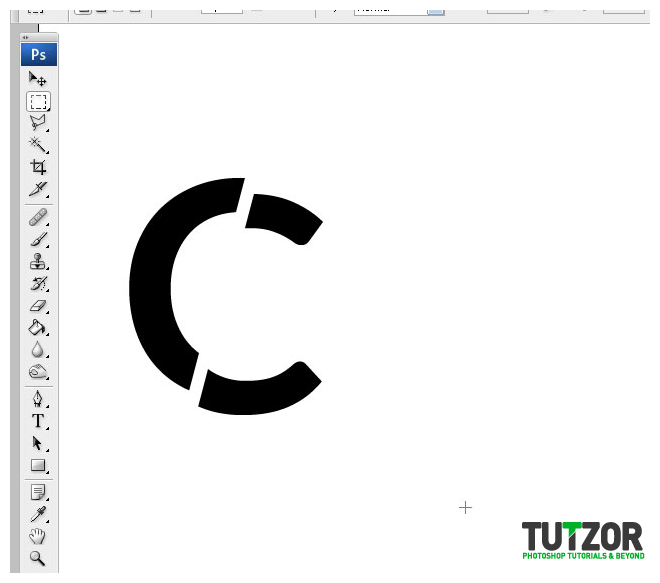
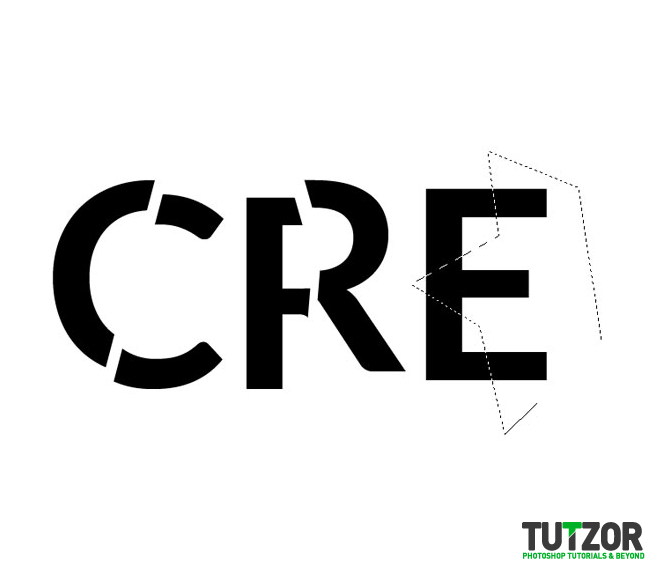
Press V, to select the move tool and start moving your selection down and to the right. Then Ctrl-D to deselect.

Step
06
Member since:
Sep 2010
Now repeat the same steps for each letter individually and make sure you cut it out nicely.

Step
07
Member since:
Sep 2010
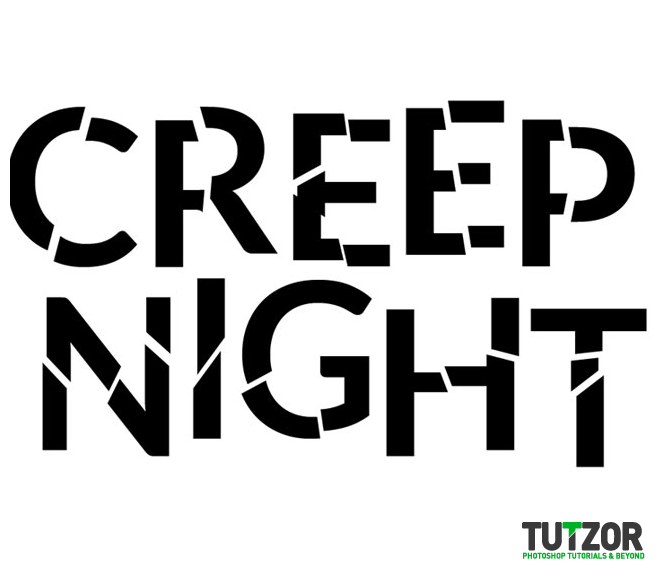
After you’re done slicing CREEP, make sure you move on to NIGHT. Now you should have each letter in its individual layer sliced apart, make sure you name each layer after the letter C, R,E ,E, P etc...
Now it’s time to add a 3D effect to each letter.

Step
08
Member since:
Sep 2010
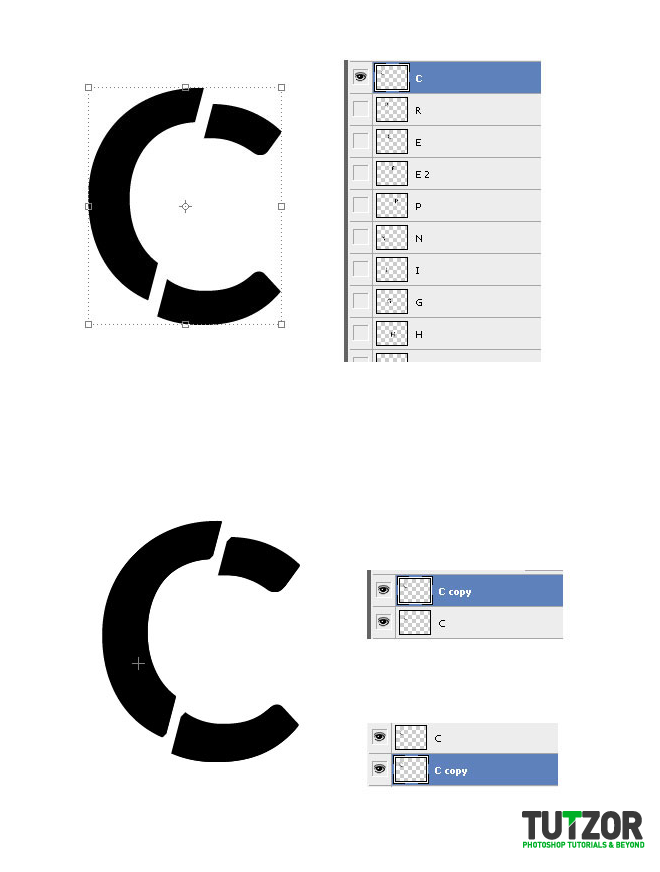
Make sure you hide all the other letters and select the C layer. With the layer being selected hold down ALT key and press the arrow keys, to create multiple layers over it. I will press the left arrow key and the down arrow key one after another multiple times. Create 8 layers over the C layer then merge them down( Ctrl-E ) until you hit the C layer. Then place the C copy layer under the C layer.

Step
09
Member since:
Sep 2010
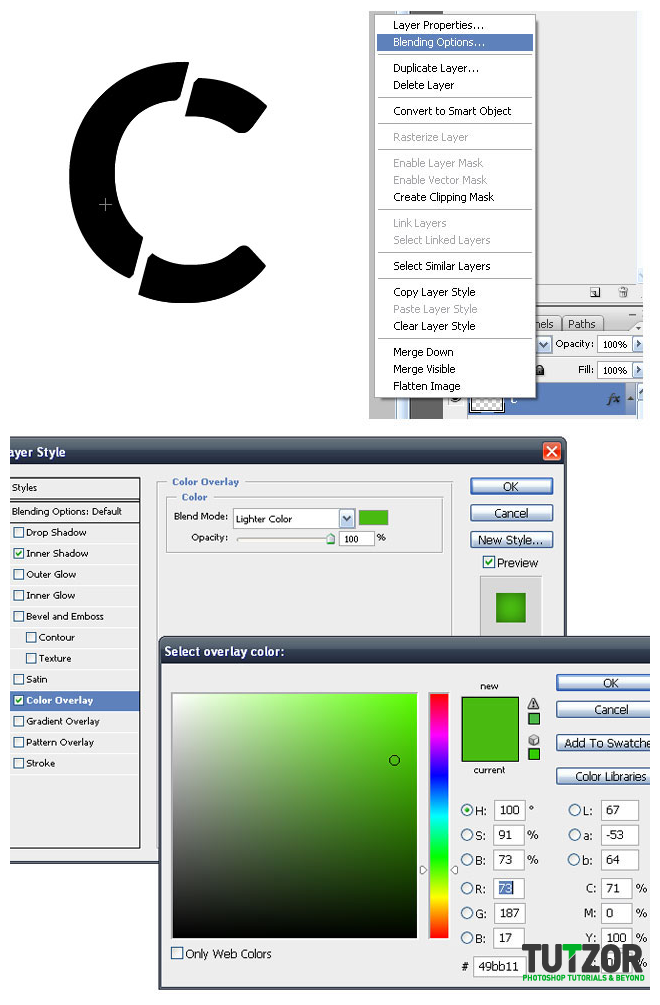
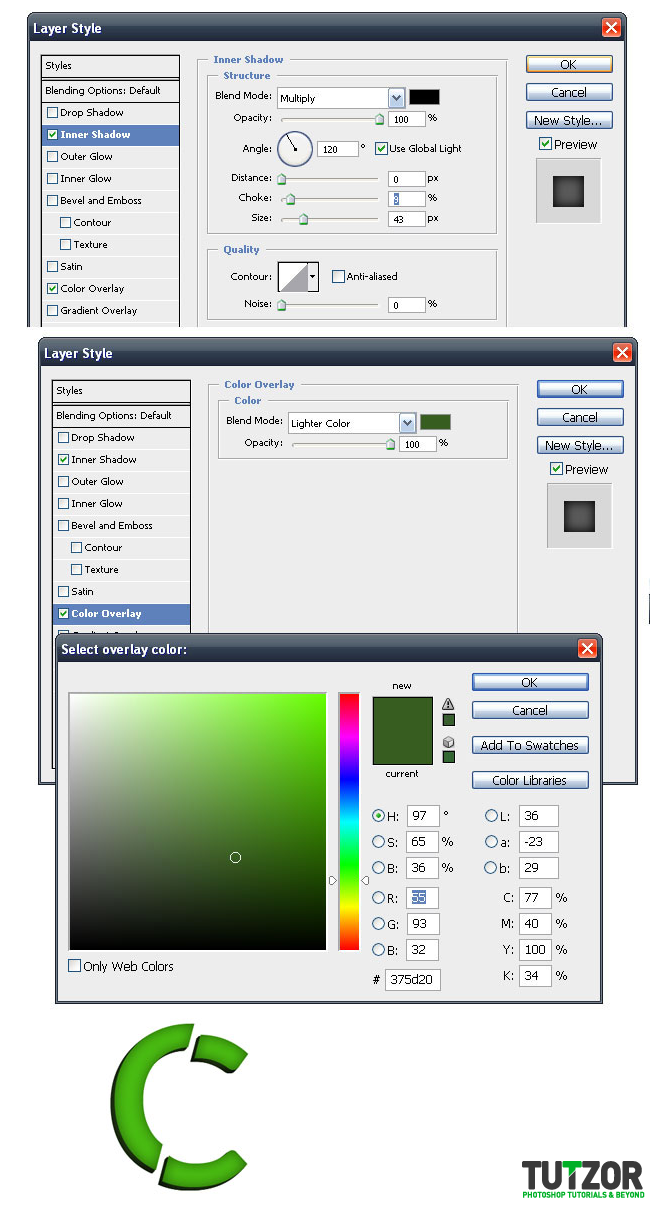
Now select the C layer. And right click on it go to Blending Options to add a creepy color and effect to it. Then Select Color Overlay, and select the same colors and options like I did.

Step
10
Member since:
Sep 2010
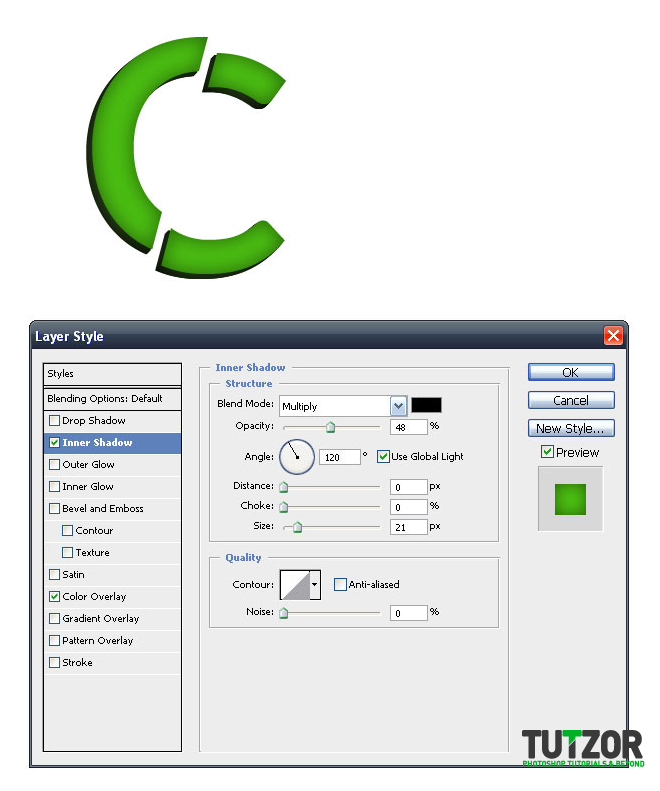
Adding Inner shadow. Select the same options. Don’t forget to set the blend mode to Multiply.
Then hit Ok .You should now get something similar to what I have.

Step
11
Member since:
Sep 2010
For the C copy layer , use the same options like I did, color overlay and inner shadow.

Step
12
Member since:
Sep 2010
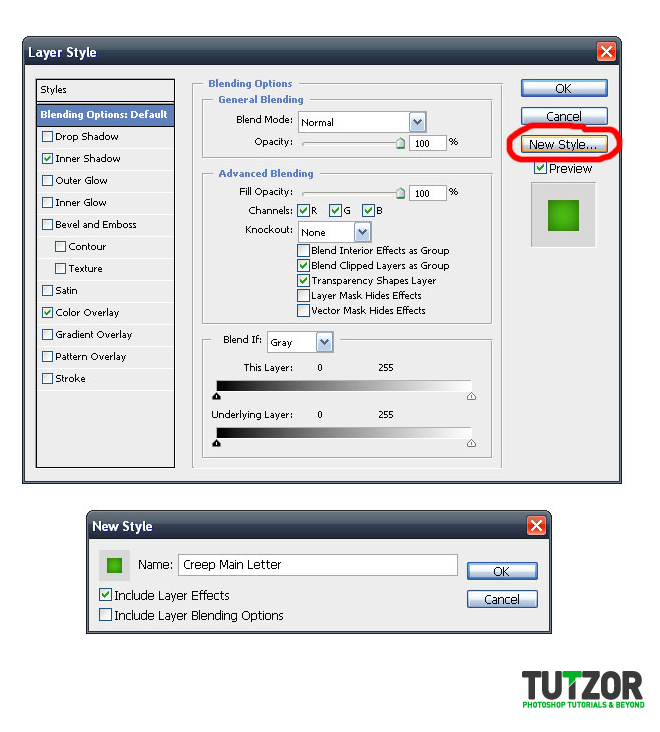
In order to simplify your job, before you start with the next letter while stil on the C layer go to blending options. and with the Blending Options Default selected, click on New Style, to create that style. Name it : Creep main letter style. and click ok. Now when selecting the Blending Options for the next letter just go to Styles and select the Creep Main Letter, and it will give you the same effects.
Do the same thing for the outter layer ( C copy layer ).

Step
13
Member since:
Sep 2010
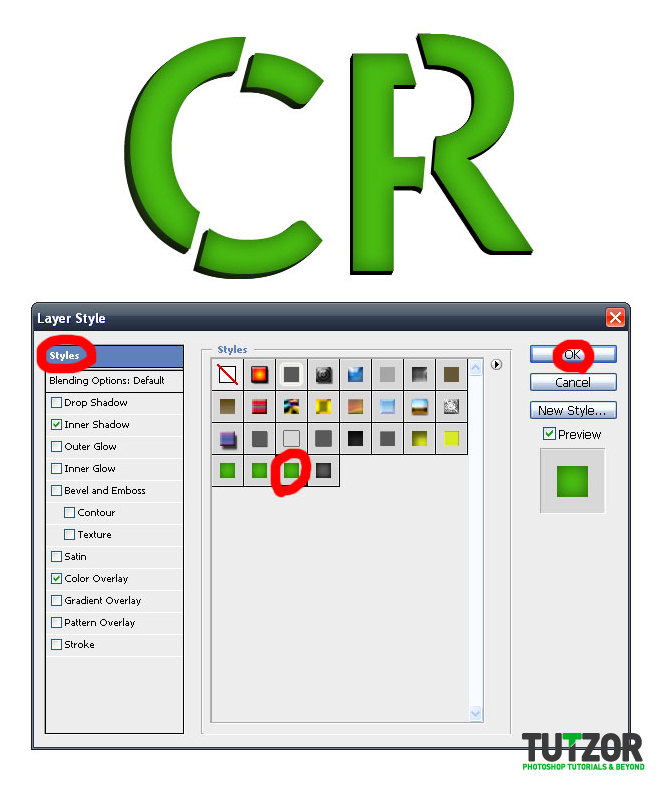
Now duplicate the layer R, and repeat the process.
When done make sure you put the R layer over the R Copy layer. Select Blending Options go to Styles, and select the style you’ve created, then hit ok.
So much easier this way. Now reapeat the same thing for the 3D effect ( R copy Layer )

Step
14
Member since:
Sep 2010
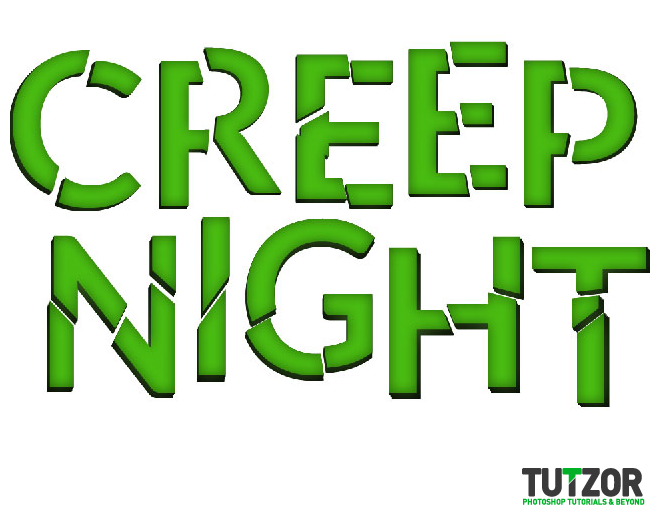
This is how you’re text ( depending on how you made the 3d effect ) should look., we will rotate the letters and bring them closer to eachother.

Step
15
Member since:
Sep 2010
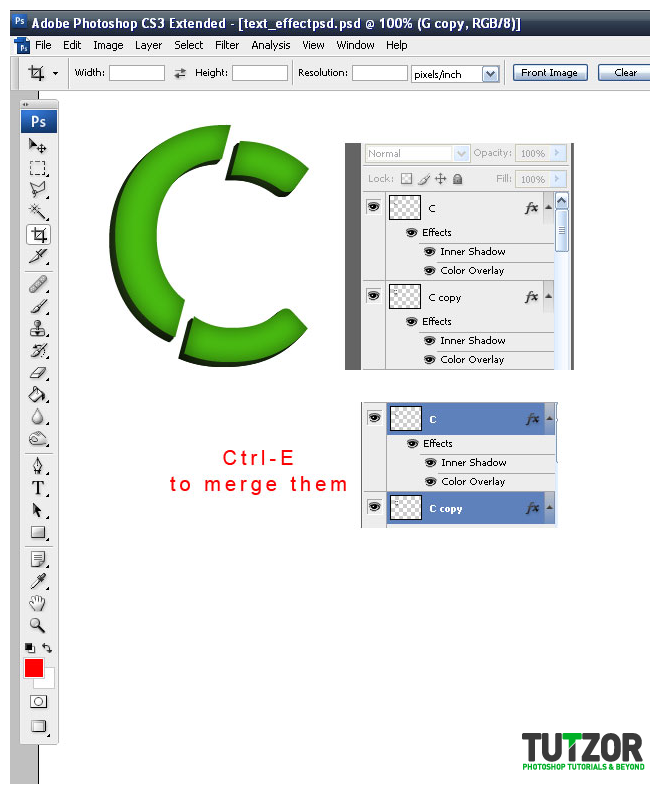
In order to rotate each letter individually, we will have to merge the two layers of each letter down, in a way that will not blend the colors together.
Now, hide all the letters and leave only C layer and C copy layer visible. Hold ctrl and select the two layers, then go to layer – merge layers or CTRL – E ( after this command you will no longer be able to change your colors or adjustments, so make sure you are satisfied with your colors )

Step
16
Member since:
Sep 2010
Now repeat the process with every letter.
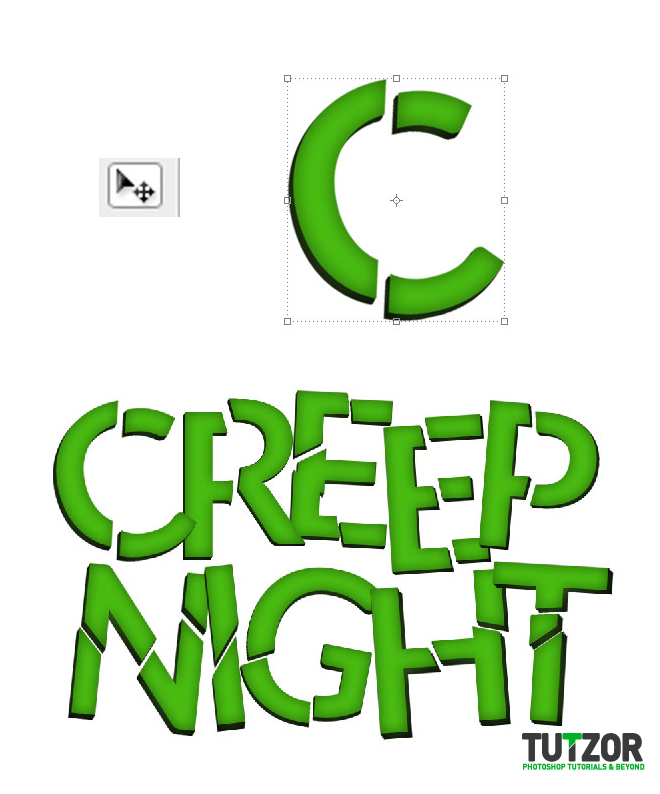
Now that you have every letter in 3D we can start rotating them, to give them a cooler look.
Select the C layer press V ( to select the move tool ) grab the letter and holding down CTRL move it from on of the ends. Now rotate each letter the way you want, you can place them over eachother.
Try to get something similar to what I have.

Step
17
Member since:
Sep 2010
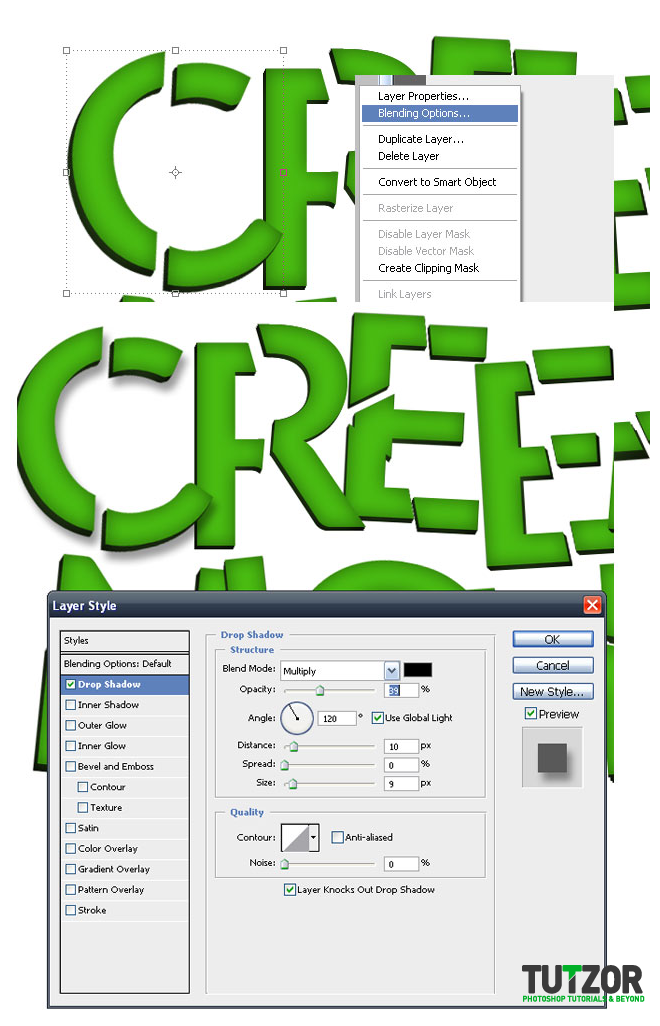
Now let’s add some shadow. Go to C layer again , right click on the layer blending options and select Drop Shadow. Use the same options like I did. Then make sure you create a new style out of it, to make it easier when u apply it to the other letters.

Step
18
Member since:
Sep 2010
Now apply shadow to the other layers.
You can change the angle slightly to other side ( prior to the first letter ) to give it a better look as you’re going.


Step
19
Member since:
Sep 2010
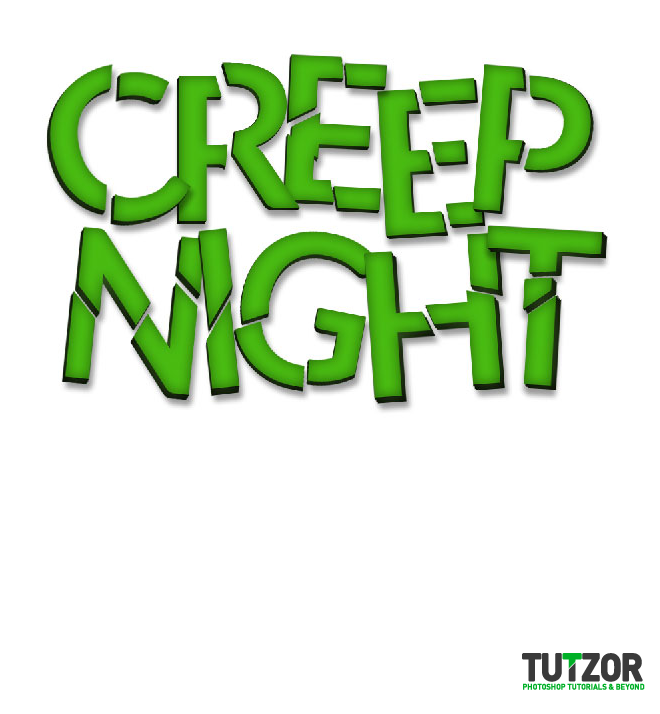
You should have something like that by now.
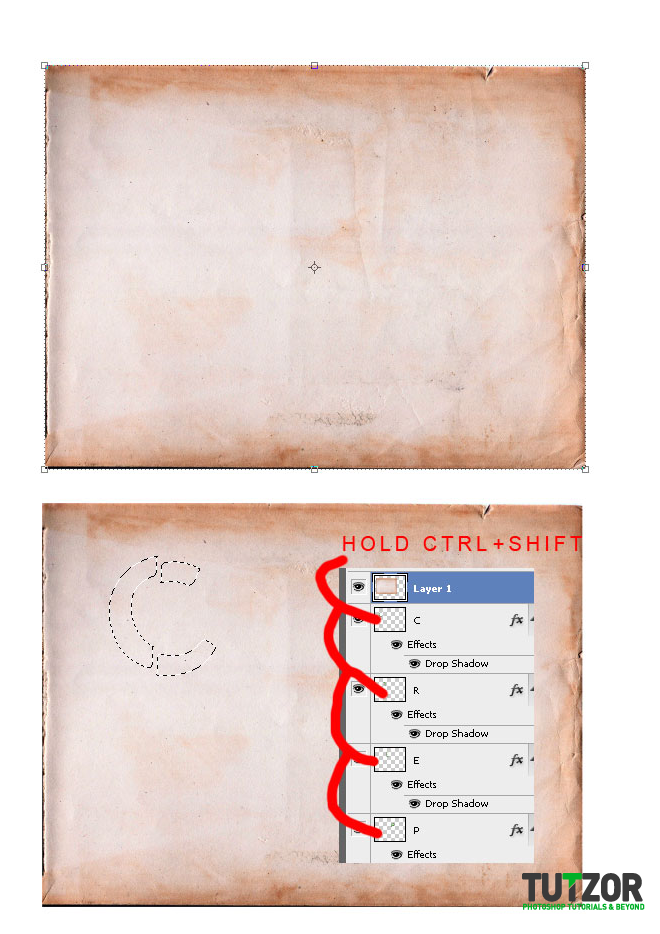
Now let’s add some grunge old texture to it. Open the file I provided you with and place it over our layers. Make it as small as I did to have just over the letters.
Whilte on the texture layer , hold ctrl-shift and select each letter layer by the thumbnail.


Step
20
Member since:
Sep 2010
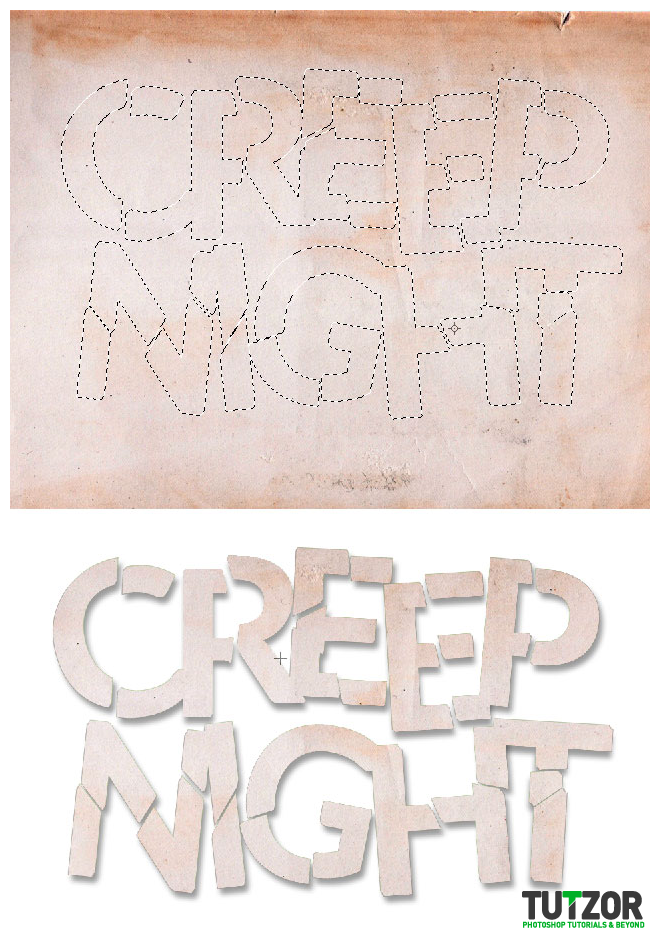
When selected press ctrl-shift-I to invert selection then press delete. then click somewhere to deselect or press Ctrl-D.

Step
21
Member since:
Sep 2010
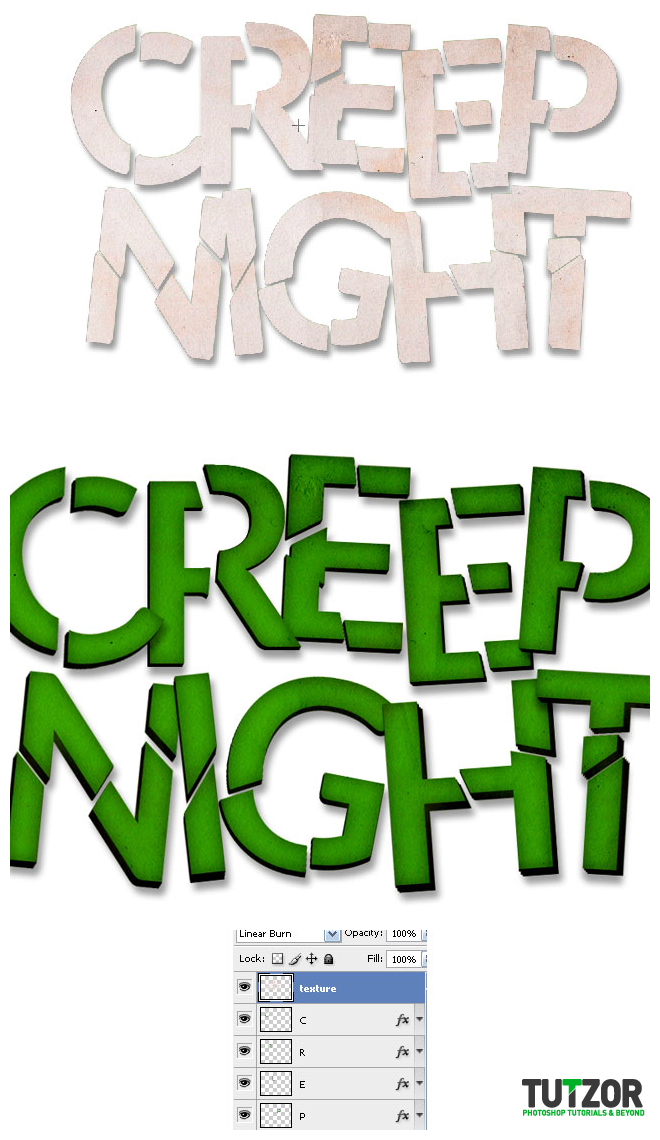
Now we have the texture only over out letters, set its blend mode to Linear Burn.

Step
22
Member since:
Sep 2010
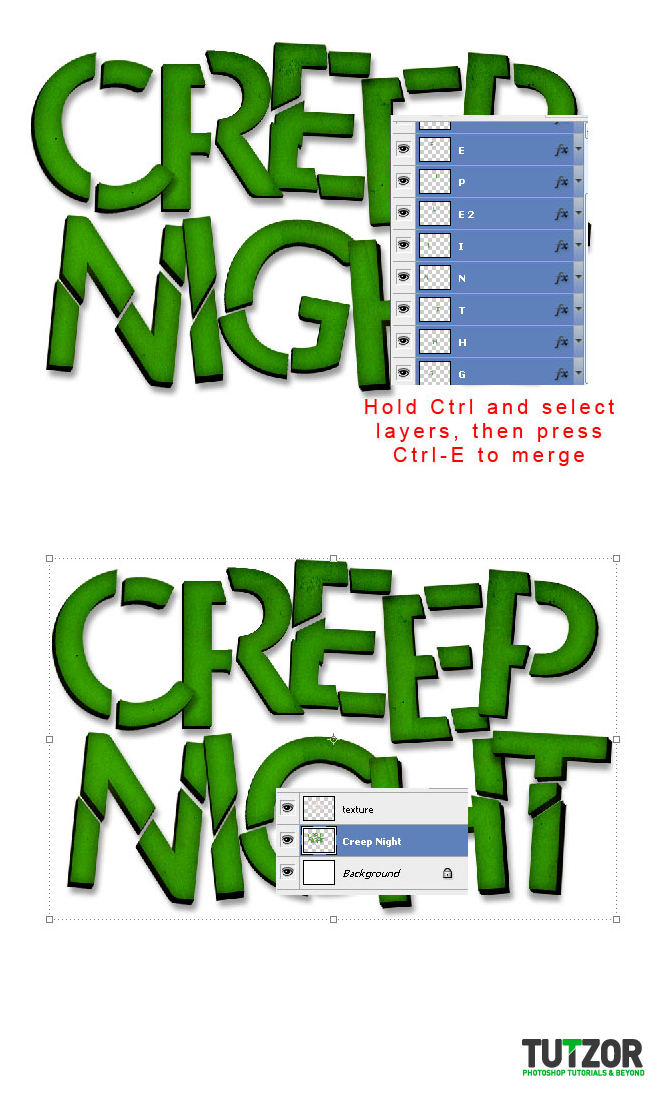
Lets merge the letters together. Hold Ctrl select the letter layers and then Ctrl-E to merge them down.
You’ll now have one layer name it Creep Night

Step
23
Member since:
Sep 2010
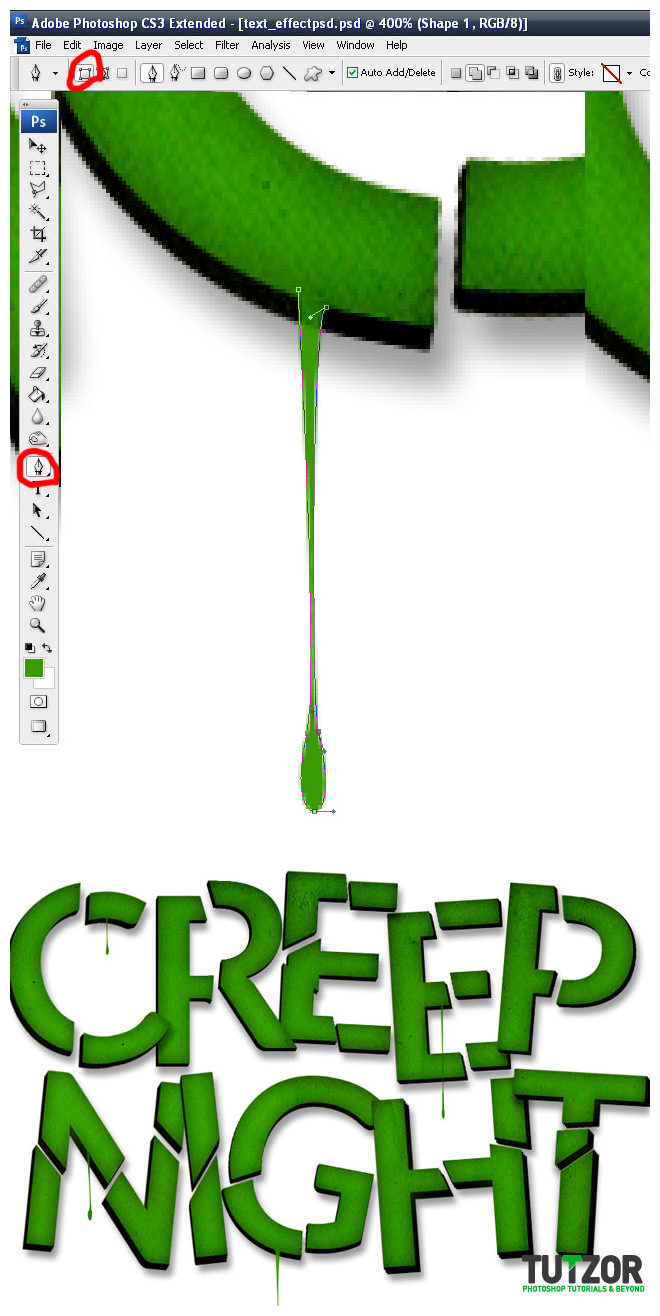
Let’s add some drips on some of the letters. Make sure you select the pen tool ( also make sure you are on the Creep Night layer not the texture one ) and try making a path like I did. Don’t forget to use the same color like the one used for the text. After you’re done add some more drips of different sizes arround the text, arround 4,5.
Simply merge them down onto the Creep night.

Step
24
Member since:
Sep 2010
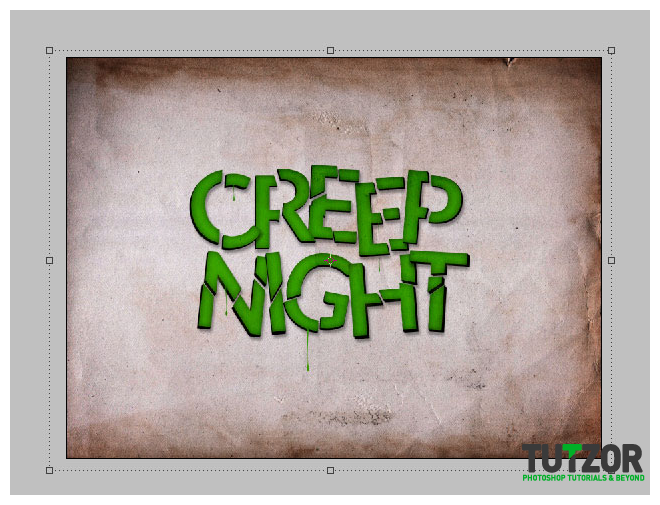
Ctrl-E to merge the texture with the creep night layer. Now we will focus on the background. Place the background i provided you with, ( or anything you want )behind our text.

Step
25
Member since:
Sep 2010
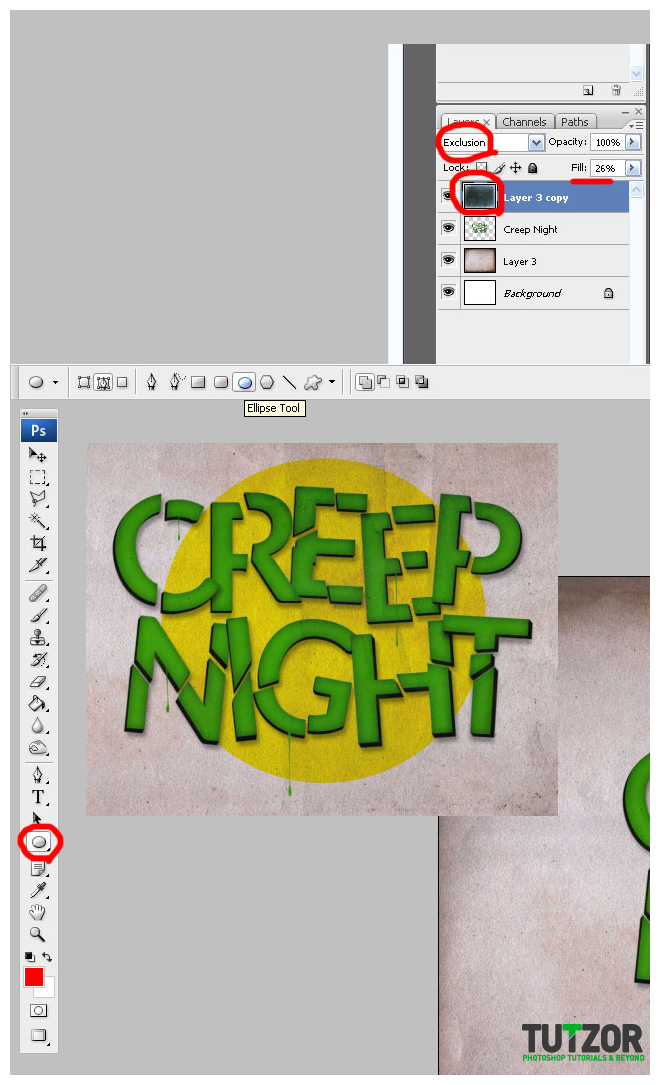
Now duplicate the background layer and place it over every layer. Set it as Exclusion and it’s fill as 26%.
Using the Ellipse tool make a circle behind the text just like mine, and set it as multiply.
