Digital Painting Tutorial

02
May'11
Seiorai
Member since:
Mar 2011

-----------This is just my own way of doing things. Not the best, not the worst out there, just mine :) I'm hoping to help somebody perhaps through this tutorial :) ------------

Today we'll leave behind for a second all those shapes and filters and automated Photoshop stuff and focus on something else for a change: painting. Yes, that means taking a blank canvas and with your awesome..or not so awesome yet drawing skills express yourself in a new way, by taking those original characters and settings in your mind and forsaking all attachment to pre-defined values and precise filters let your fantasy flow :)

For this tutorial it is strongly recommended that you have a graphics tablet. It is not imporrible to do it with a mouse however it would take ages more. I am currently using a Genius Mousepen 6x8 tablet, but you can use any other, of course.

First, I want to mention that this is not a tutorial to teach you HOW to draw (anatomy/etc), but how to use colors to bring an existing rough sketch to life.
Second, a small word of wisdom: learning how to paint is more than splashing some colors here&there. You definitely won't learn painting in this tutorial, you will learn some techniques only, which you can later improve and adapt to fit your own style as time goes by and you become better and better at this. It will take you months, perhaps years to be able to draw virtually anything you have in mind, so be patient and work with love ^_^

Third: before starting, here are a few awesome tutorials you should be interested in checking out:

These are just a tiiiny few, so always feel free to look for more ^^
Okay. That being said, let's go on to the juicy stuff :D
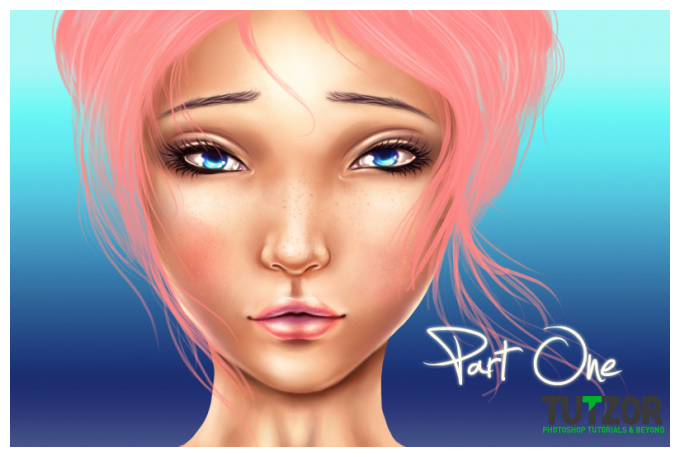
This is what we'll be making: a portrait of...Chloe. More exactly, MNF Chloe Amethyst BJD xD
You have no idea what a BJD is? Too bad. Here she is: http://dollfairyland.com/shop/step1.php?number=677
Wll my version of Chloe is more grown-up but hey! artistic license FTW ^__^
In this part of the tutorial we will focus only on the face itself, not the hair yet (but that doesn't mean we can't include the hair in your sketch ^_~ )

NOTICE: This is Part 1 of a longer tutorial. In this part we will ONLY deal with painting the faceand its elements :)
Part 2: Chloe's hair tutorial.

Rating

Your rating: None Average: 4.5 (93 votes)

Required Files

Final Image

Step
01
Seiorai
Member since:
Mar 2011
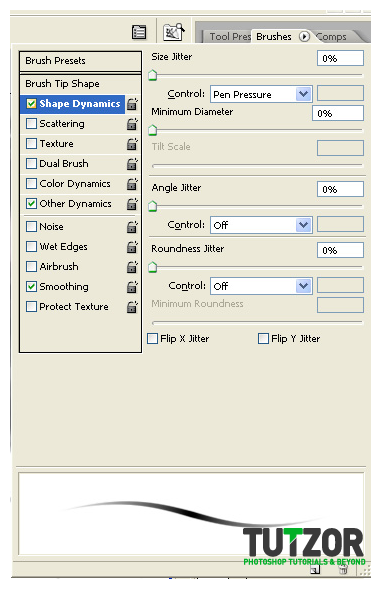
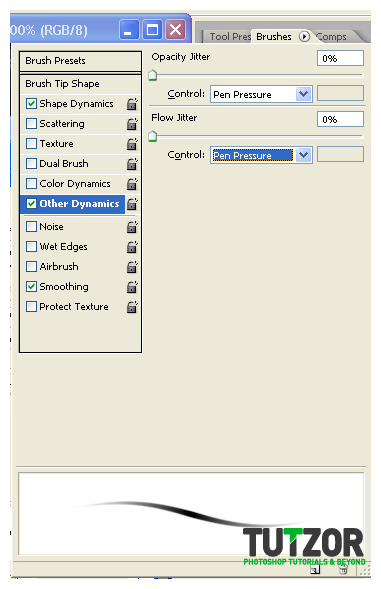
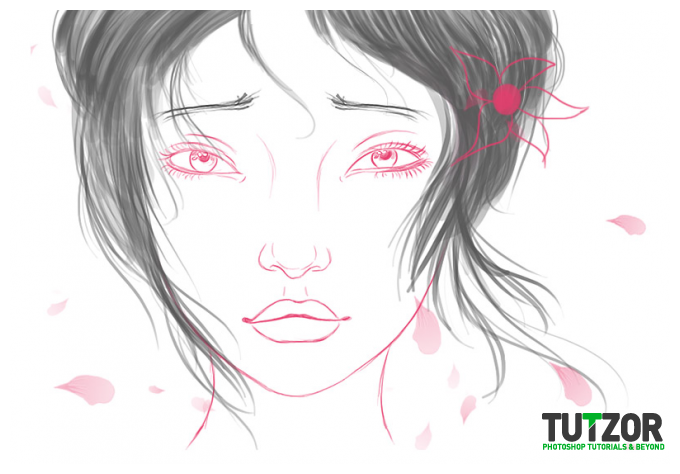
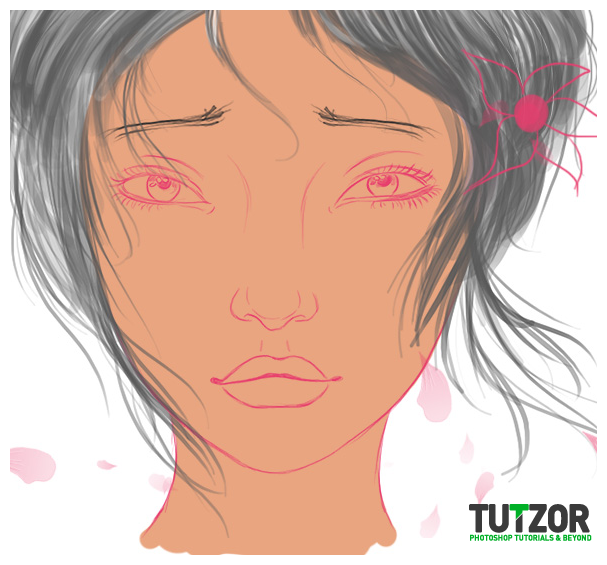
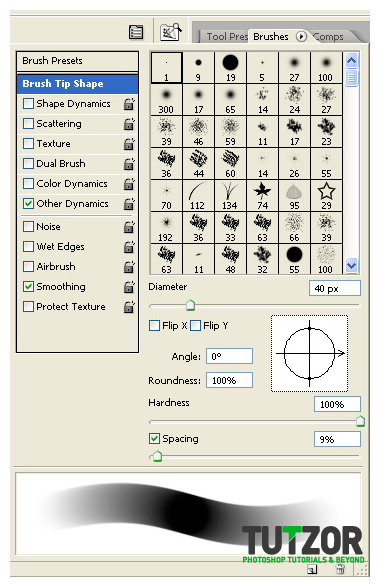
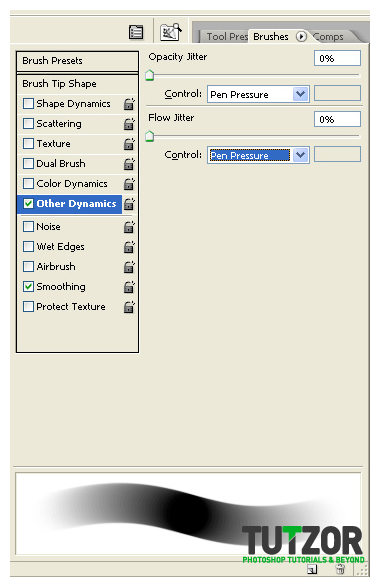
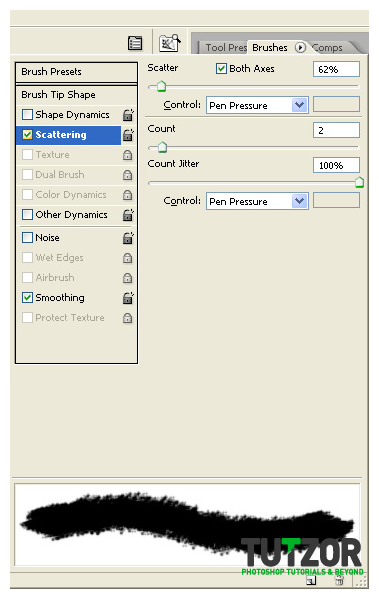
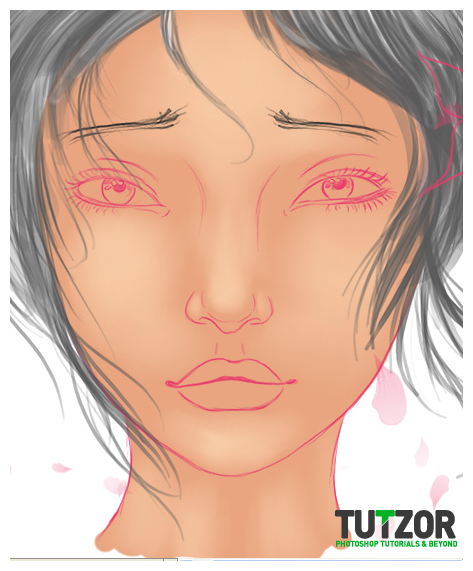
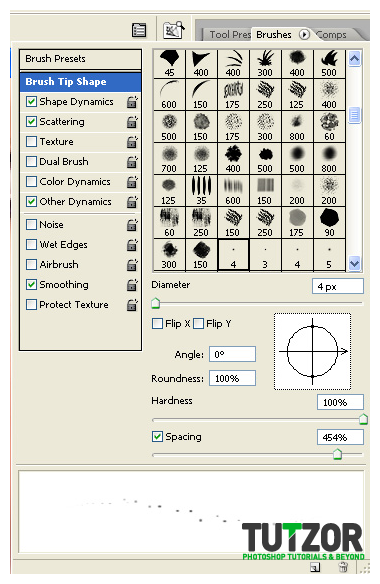
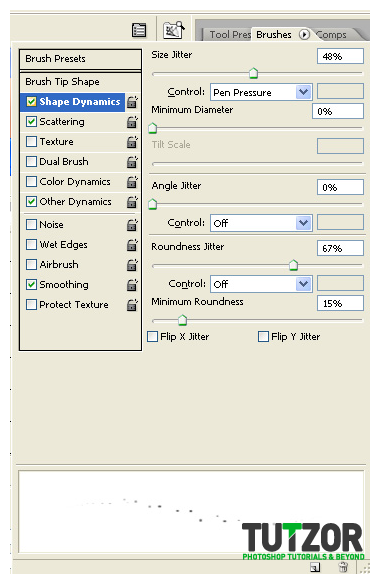
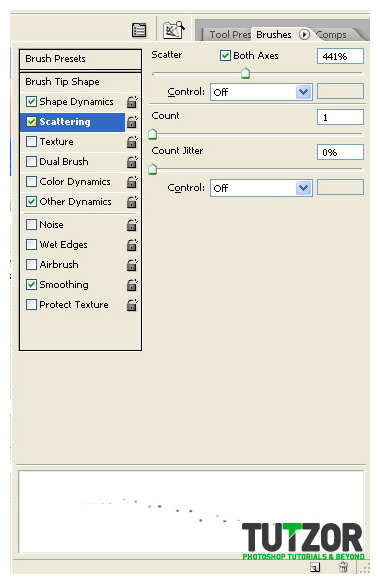
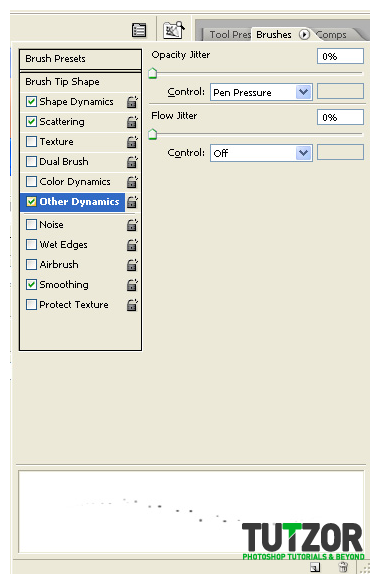
Okay...what you need first is an idea. Then, you go ahead and sketch that idea either on paper or directly in Photoshop/SAI/Open Canvas or whatever graphics program you are using. ------------------>For most of the tutorial, including the sketch itself, I will be using a hard, round brush with Shape Dynamics and Other Dynamics checked, like in the pictures 1&2 below: Here is the sketch I have made (picture 3) :
Step
02
Seiorai
Member since:
Mar 2011
Notice that it doesn't have many details at this stage - since this is a tutorial focusing on the face, any details will be coming later. I usually strongly suggest you think of all the elements of a picture (including background) before starting to actually color it. However, this time we will work as simply as possible, since I don't want you to get confused ^^; Alright. So we have the sketch now :) Time to start painting ^__^ Right. Now you should have two layers in your Layers Palette: one white background, ont transparent sketch lines. You can name one "Background" and the other "Sketch" for now :) First, let's create a new layer inbetween the two, name it "Base Color". Now the lining-up should be as follows: Background layer--->Base Color layer--->Sketch layer. Let's choose a base color - say #e9a580 - and start painting on the "Base Color" layer, following the outlines of the sketch. Like so:
Step
03
Seiorai
Member since:
Mar 2011
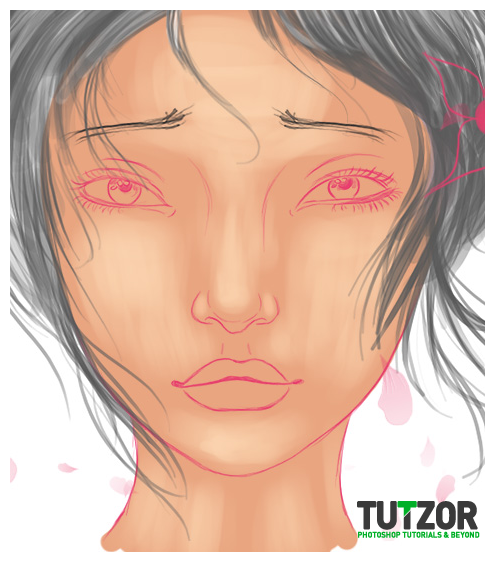
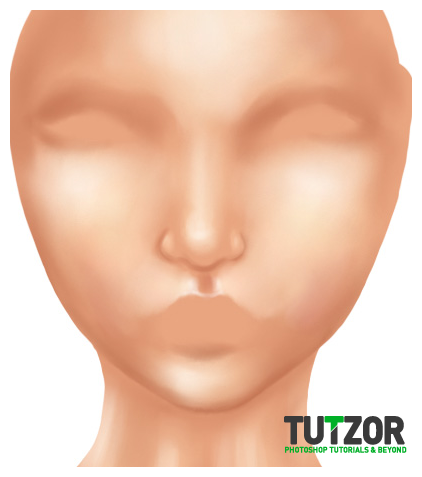
Good :) Now hide your Sketch layer and make sure the edges of the "Base Color" are not bumpy xD Yeah, it happens to me a lot, so after I fill with color I usually double-check for bumpiness <333 -------------------- Okay, that done with, moving on to adding the first highlights :) Create a new layer on top of your "Base Color" one, name it "Highlights". Right-click on it and choose Create Clipping Mask. Until your hand is sure of itself, this is the best way to ensure you stay with your color "within" the face, hahaha xD Take a hard, round brush and give it the settings from image 1&2 below. Set it to about 30-40px in size, depending on the size of your canvas ^^ Begin brushing around the cheeks, chin, nose and forehead. Vary the size of your brush using the [ and ] keys on your keyboard :) [ is for making your brush smaller, while ] will make it larger ^^ Vary the sizes a lot and zoom in for details :) Haha..she looks weird at this stage xD Bear with me :)
Step
04
Seiorai
Member since:
Mar 2011
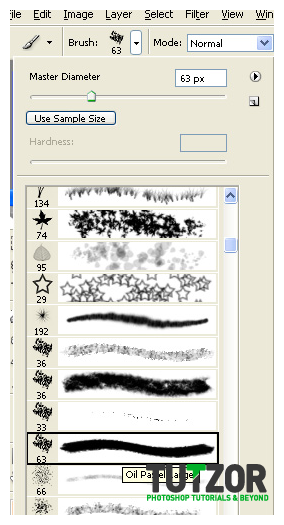
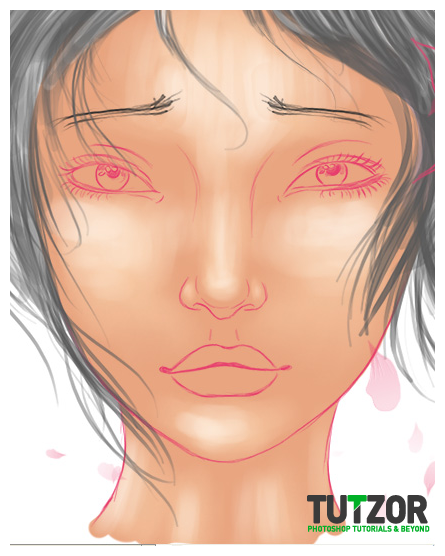
Riiight....what we need to do now is blend those highlights with the rest, right? Right! So here's what we'll do: we'll use the infamous Smudge Tool <3 I know that many artists say that you shouldn't use it but I do ^^ But it's no ordinary Smudge Brush..no...o__o It is a custom one of course :) So. Take the Smudge Tool (R) and go to your brushes palette. Choose the one named "Oil Pastel Large". The one in image 1 below---> Then go to the brush settings palette and give it the settings in image 2 below--> Sweeet! =D Now start smudging around, on the "Highlights" layer, to blend it with the rest of the base color :) Smudge until you get something like in image 3 below. Make sure to remember varying your brush size like in the step before, this will give more of a natural un-evenness to the face :)
Step
05
Seiorai
Member since:
Mar 2011
M0ar highlights are on their way! Create a new layer above your "Hightlights" layer...transform it into a clipping mask to the "Base Color" as well, then set your Foreground color to #fef0e3 and making your brush a little smaller, start painting the secondary highlights. This is where the light hits the hardest. Therefore, it'll glow the most, here the skin will be the lightest color. Like in image 1 below---> Then take the blesses Smudge tool with the same settings as before, and blend the secondary highlights in like in image 2 below :) After doing so you can safely merge the secondary highlights layer with the main Highlighs one ^^ -----------------> Note: At this smudging, be veeeery gentle, so that you leave some traces of brush texture. It will be helpful later, trust me. So don't smoothen it our flat hahaha :)
Step
06
Seiorai
Member since:
Mar 2011
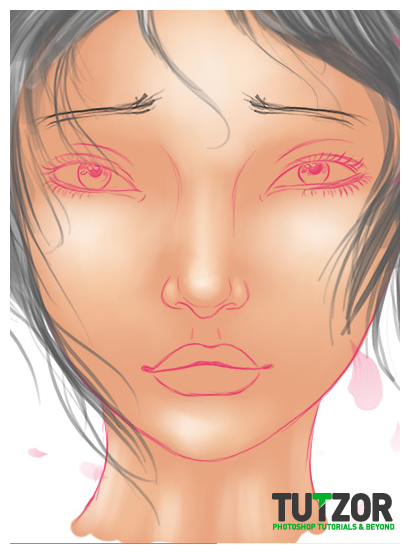
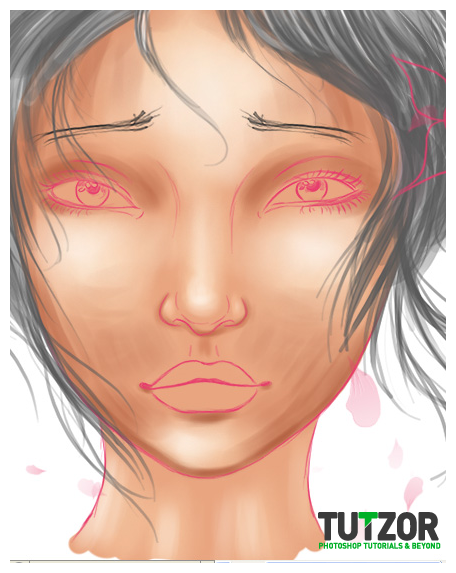
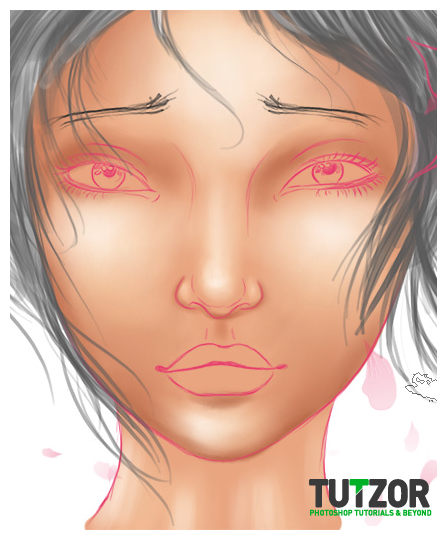
Okay...now that we dealt with the Highlights, let's take care of the shadows. Don't want them to feel neglected in any way, do we? ^^ Shadows... Create a new layer over the Highlights one, name it "Shadows" and right-click--->Create Clipping Mask to transform it into a clipping mask to the "Base Color" layer. Riht now you should have: 1xBackground layer, 1xBase Color layer with 2x clipping masks (Highlights and Shadows) and 1xSketch layer. At this stage is where our painting will come alive, and be more than just come airbrushed colors :) So take care at this step okay? Let's set our Foreground color to #ab5436 and lower the opacity of our Brush to about 50%. Then on the Shadows layer begin to brush gently around the edge of the face...the lower cheeks (very, very lightly here), around the nose bottom and nostrils...the eyes...the edges of the forehead...under the lower lip a bit...good. See image 1 below for a visual guide :) Take the smudge tool...and..smudge...see result in image 2 below :)
Step
07
Seiorai
Member since:
Mar 2011
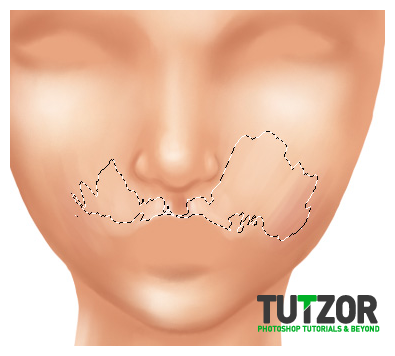
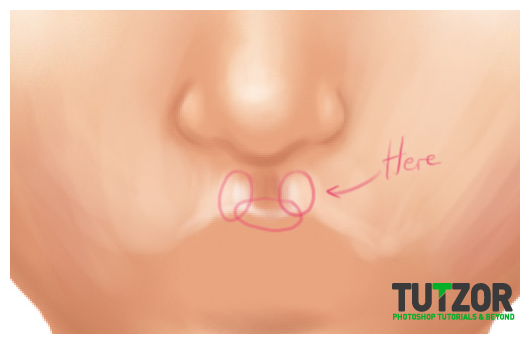
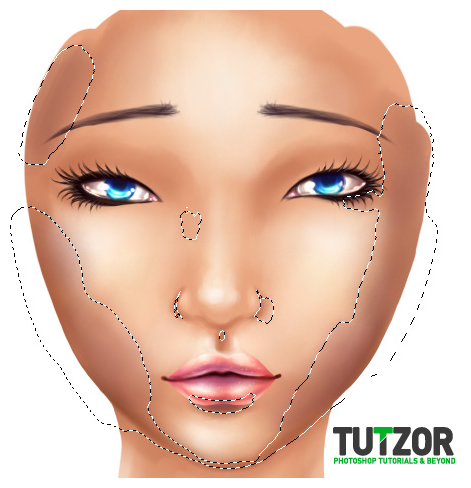
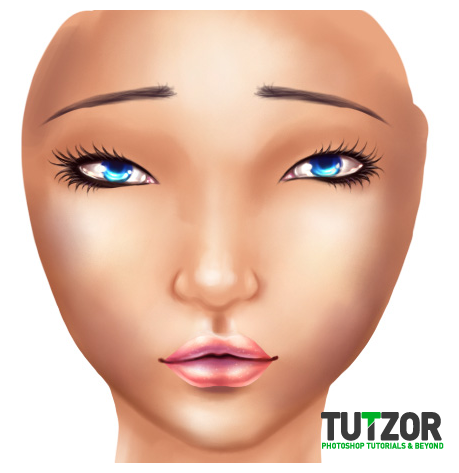
Alright. Now we go into the realm of fine-tuning. Create a new clipping mask above the Shadows one, name it "Fine-Tuning". Set your Foreground color to #f3c5a7 and make your brush smaller in size. Brush in the areas selected below, in image 1----> Change your Foreground color to an almost-white and add two tints of highlights over the ridges of the skin that is between the upper lip and the nose. Also notice how I added some highlights around the curve line at the middle of the top lip? See image 2 below for a visual ^_^ When you are done, very gently smudge the thingy, to smooth it out a tiny bit, like in iamge 3 below (I hid the sketch layer to make the finetuning more visible for you).
Step
08
Seiorai
Member since:
Mar 2011
Starting to look a bit better neh? :) Okay....now I will tell you a secret: shading of the indivisual parts works better when you have all face elements color-filled. So at this moment we have the basic shading of the face down, good! Let us stray a bit from skin-shading (we will return later), to add the lips, eyes and eyebrows in. Let's start with the eyebrows, they are the easiest. Create a new layer on top of all your others...yes on top of the sketch too... name it "Eyebrows Base" and set your Foreground color to something close to #452c32 to draw the base of the eyebrows. With a small, hard, round brush (say about 5-6px in size) brush the base color of the eyebrows...then make your brush smaller to 2-3px and draw some individual hairs here&there for detail. So that you get something like this (zoomed in 200% for improved visibility) Note: after drawing one eyebrow, you can duplicate it and flip horizontally, saves time :) Remember to merge both layers into one large "Eyebrows Base" layer if you do this ;)
Step
09
Seiorai
Member since:
Mar 2011
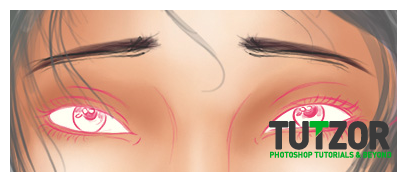
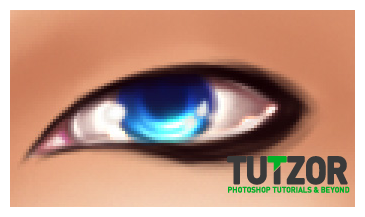
Mmkay...now you can move the "Eyebrows Base" layer under the sketch layer...for now if you want. Then make another layer above it, name this new layer "Eyes White". Set your Foreground color to #ffffff and take the same brush as before (vary the size, of course) and following the outlines of the sketch, fill with white the insides of both eyes. Like in the first image below: After that, create a new layer over it and right-click on the new layer--->Create Clipping Mask. Name this layer "Iris". Set your Foreground color to a medium blue (I'm using #1f5bc0) and fill in the iris of the eye. Good...let's leave it a flat color for now, and go back to the eye white. Create a new layer and move it between the "Eyes White" layer and its "Iris" clipping mask. No need to name this layer yet as we won't keep it for long. Now your eye should look something like in image 2 below:
Step
10
Seiorai
Member since:
Mar 2011
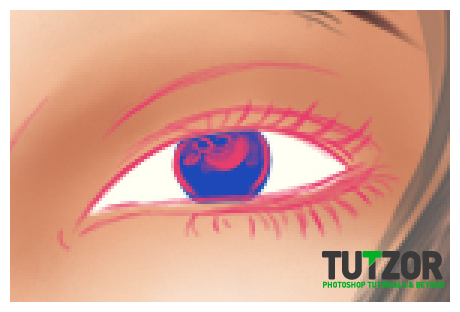
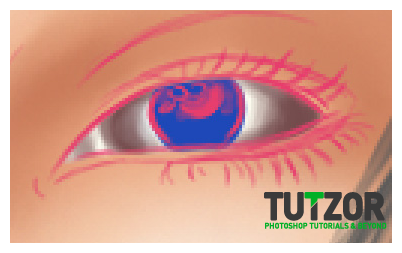
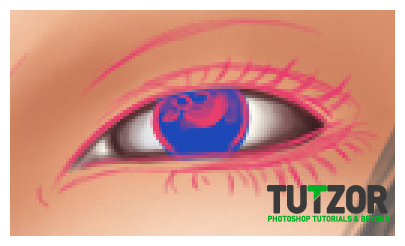
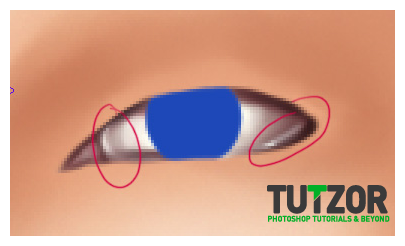
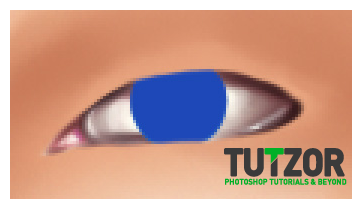
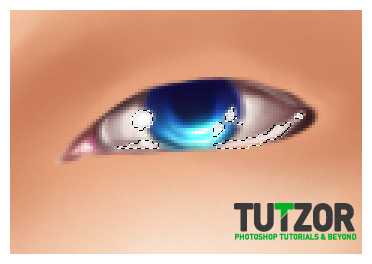
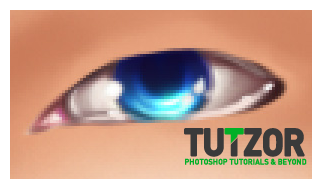
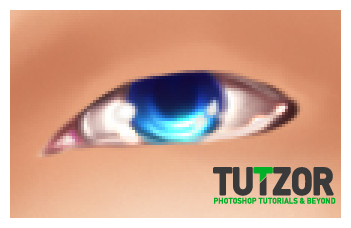
Right..now it's time to shade that eye white, it looks hella boring like it is now hahaha. Okay, now let's set our Foreground color to a medium brown (I used #72494a) and out Background color to pure white #ffffff Then with the same brush as before let's shade the outskirts of the eyewhite (be careful to work on the unnamed layer we made before!) ...yea..let's shade the outskirts of the eye, using firmer strokes the farther from the iris we go, and light strokes around the iris itself. From time to time press the X key to switch between your Foreground brown and the Background white, to shade with whiter tones around the iris. Like in image 1 below: Good! Now use that smudge tool from before..set to a very small size say 10px to even it out a little bit. Next, set your Foreground color to a dark brown (I used #3b1d1d) and seting your brush size to about 5px, zoom in to some 300% and paint on the unnamed layer around the edges of the eyewhite, like in image 2 below: -------------------->Advice: Hide the sketch layer every now and then, it will allow you to view mistakes in shading. Okay, now let us give our eye a realistic reflecting touch. Now we'll use the ALT key to sample colors...so: click ALT key and hold it, then with the mouse click somewhere within the eye to sample a very light gray..almost white from the center of the eyewhite. You will notice that by click&holding ALT and at the same time clicking with your mouse on the canvas, your Foreground color will become the color which is within the clicked pixel. Good..now that we have our Foreground color to a nice almost-white (mine is #e3e5e7) let us paint (still on the unnamed layer) gently...around the very edges of the eyewhite, in the bottom and inside corner parts. Yes, we'll paint light color over th dark one, ain't that a kick in da'head matey? xD The whole point of this is to create that mother-of-pearl feel a real eye has :) So. After doing this your eye should look somehting like in image 3 below. Notice the red circled areas? Next! You know how you have pink tones in your own eyes at the inside corner of the eye? Okay, let's give our Chloe pink too :) Set your Foreground color to a gentle cherry tone, say #c0638b and brush around the inside corner of her eye. Also use a bit of white here&there to create the impression of moist eyes. Looks good on girls thehehe ^_~ You might need to take the dark brown color again and brush lightly over the pink, to keep the shadow effect. In the end the result should be similar to image 4 below:
Step
11
Seiorai
Member since:
Mar 2011
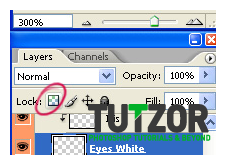
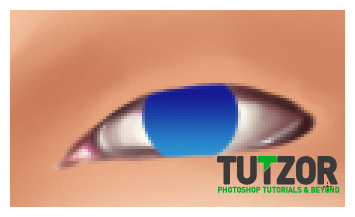
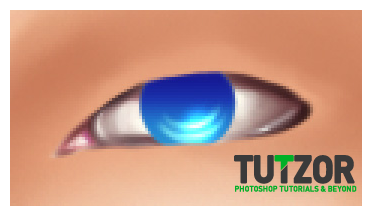
Phew, got that sorted out :) Okay. Now you can safely merge the unnamed layer with the EyeWhite layer by using Cler (Cmd on Mac)+E. Remember now that "Iris" layer? He's feeling lonely and forsaken, let's give him some attention xD So. Let's set our Foreground color to #298fd0 and out Background one to #151a92 and take the Gradient Tool. Set it to Linear Gradient, Foreground to Background. Then lock the Transparent Pixels on the Iris layer (see image 1 below to find out where lock transparent pixels icon is if you don't know already) then with the gradient drag from bottom to top on the iris layer, so that you get something like in image 2 below: Okay...now set your Foreground color to #92ffff and draw two half-moon shapes in the bottom part of the eye. They should gently "hug" the pupil. Then set your Foreground color to white #ffffff and making your brush even smaller brush very lightly in the "middle" of the two half-moon circle signs. Like in image 3 below:
Step
12
Seiorai
Member since:
Mar 2011
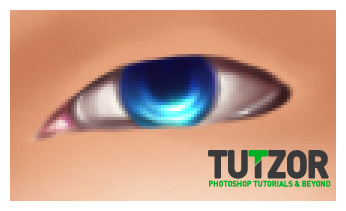
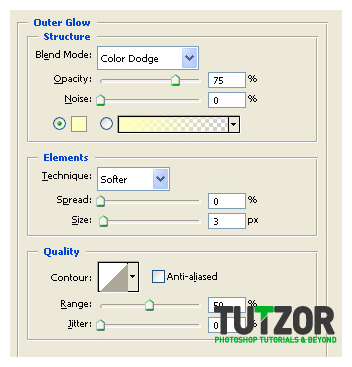
Let's create a new layer above the Iris one, make sure it is also a Clipping Mask to the "Eye White" layer, and then set your Foreground color to a dark blue, say #12123d Taking a small, 3-px brush paint the shape of the pupil and also gently stroke the outline of the iris, so that it now looks surrounded by a dark circle, like in image 1 below: Mmkay. Lower the layer's opacity to about 80% and then you can safely merge it with the Iris one. Just a little distance left to go :) Create a new layer above the Iris one and name it "Moist Highlights". Then take a small 2px brush and set your Foregroudn color to a very very light yellow or cyan, depending on preference. I chose #f4fcfc After that brush in the areas selected in image 2, so that you get something like in image 3 below: Good..... Now these need a bit'o'shine :) So. Give the "Moist Highlights" layer the layer style in image 4 below, so that your final results is close to image 5 below------->
Step
13
Seiorai
Member since:
Mar 2011
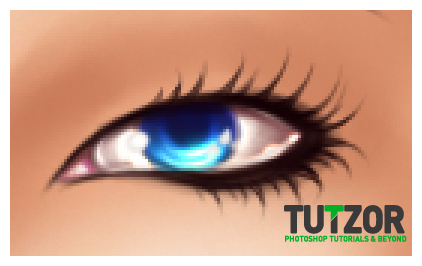
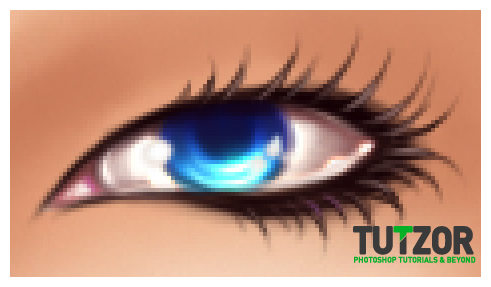
Good!! Now it's time to take care of the makeup :) Can't have a girl without it, riiight? xD Create a new layer above your "Moist Highlights" one, but this time don't turn the newly created layer into a clipping mask, but leave it ..errr...loose? xD Anyway. Name this "Base Makeup". Take a dark brown like #140104 and setting your brush to a 4-5px size (but you'll need to vary the size for the corners) start drawing so that you get a shape like in image 1 below: Make sure to shade a little, very little over the eye white itself, so we get a nice effect of 3D shadow. Okay, now create a new layer above the "Base Makeup" one and name it "Eyelashes". Set your brush to a 2px size (but vary it to 1px from time to time for the tips of the lashes) and draw the lashes baby <3 Like in image 2 below. Make sure your eyelashes are thicker at the bottom and thinner at the top. You can also use a soft round Eraser with a very, very low opacity in the end to gently erase the tips, so as to make them more realistic :) Next! We need to make our lashes..well her lashes I should say...3D looking :) So take a 1px brush with the Foreground color set to #826461 and gently brush on each lash like in image 3 below:
Step
14
Seiorai
Member since:
Mar 2011
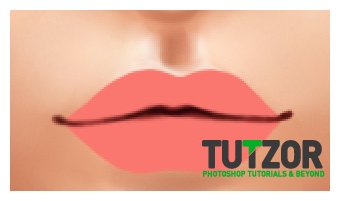
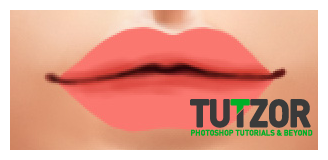
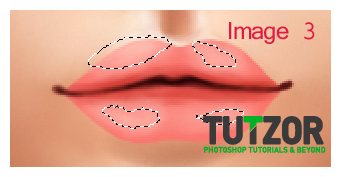
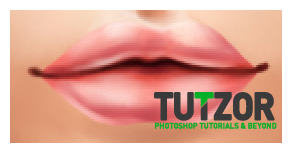
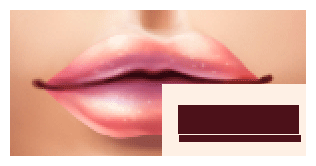
Sweet! Now if you want you can Group all eye-related layers into one large Group named "Eyes". Now follow the exact same process described above to create the second eye ^_^ I don't recommend just duplicating and flipping the first eye, it ALWAYS give weeeeird results xD ....................................................... Now let us move on to the lips. Create a new layer above all your eyes-related ones, name it "Lips Base" and take a base color of #fa776f and fill in the base color following the outlines of the sketch. After that, make a new layer above it and name it "Lips line" Take the #290507 color and gently block in the "hole"...of the mouth, hahaha Follow the outlines of the sketch, of course. ----------------->Tips: make the line thicker in the center, and thin, only an impression, around the outer edges of the mouth. Like in image 1 below: Take then a rose color, say #e05048 and create a new layer, which we'll move inbetween the "Lips Base" one and the "Lips Line" one, right-click on it and transform it into a clipping mask to the "Lips Base". Then with a roughly 9-10px brush (vary size when you need) brush with the rosy color all around the line of the lips, above and below it. Like in image 2 below----> Good. Next you can merge this unnamed layer with the "Lips Base" if you want. Then create a new layer, make it clipping mask to Lips base...and taking a light rose color..I used #fbb3a9....brush the first highlights in the areas selected in image 3 below:
Step
15
Seiorai
Member since:
Mar 2011
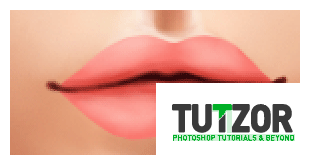
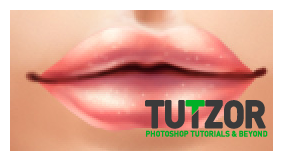
So far so good :) Merge this layer with the Lips Base, it's safe. Then create a new layer, clip-mask it to Lips Base....and take a very light rose color, say #fde7db and brush lightly in the areas shown below in image 1, insisting in the areas of the top crease of the lips. The animation shows the difference. Right, now of course you can merge this with the main Lips Base layer. And of course now we'll create a new clipping mask...and taking the #bb424b color we;ll add the shadows of the lips. Insist mainly on the bottom of the bottom lip, as well as the bottom of the top lip. Animation in image 2 shows difference. Merge it with the Lips Base layer if you want... Then let's create one more layer, make it into a last clipping mask of the Lips Base layer and taking a light rose color (I used #fce5e0) and a small brush, paint the "glossy highlights" on each lip. Think as if the girl has gloss on her lips :) Do it at the bottom of the top lip and at the bottom of the down lip. Like in image 3 below---->
Step
16
Seiorai
Member since:
Mar 2011
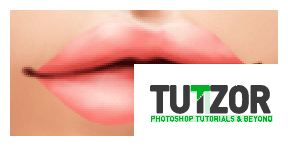
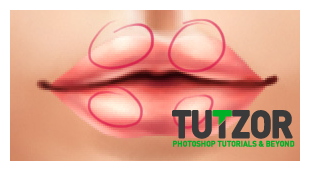
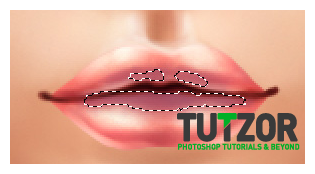
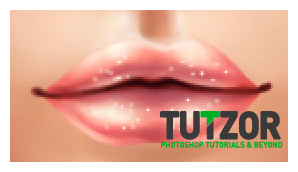
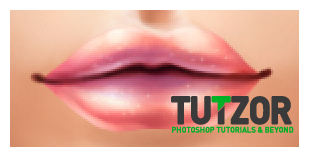
Nice :) Now, take the Dodge Tool, set it to a soft, round brush of about 20px in size, set it to Range: Highlights, Exposure: 8% and Airbrush: ON, and add a tad of highlights in the areas circled in image 1 below: Okay, now we'll add the final touches to our lips. Create a new layer above the Lips Base one, no need to make it into a clipping mask, don't worry. Set your Foreground color to a gentle purple, say #a85368 Then take a medium-sized brush of about 10px and brush a little in the selected areas in image 2 below: Adjust the layer's opacity as needed (I lowered mine's to about 90%). Feel free to merge it with the Lips Base layer. After that we'll create the glittery-glitter xD So. Take a small, 1px brush and on a new layer above the Lips Base one make a multitude of 1px points. Like in iamge 3 below----> They look weird now, don't they? That's why we'll lower the layer's Fill to about 70% and set its Blending Mode to Soft Light. You can merge it safely with the Lips Base if you want....then the final gloss should look like in image 4 below. Just a very subtle thing :) --------> One last thing. See how the originl Chloe has purple on her lips, near the "line" of the lips? Let's Ctrl(Cmd)+click on the "Lips Base" layer's thumbnail in the layers palette in order to obtain its selection, then go to the bottom of our Layers Palette and look for the "Insert new Fill or Adjustment Layer" icon (that's the one shaped like a black&white circle) and click on it....choose Photo Filter. From the Photo Filter menu choose "Cooling Filter (LBB)" and set its Density to about 25%, making sure the "Preserve Luminosity" checkbox is checked! Click OK then your final lips result should look something like in image 5 below--------->
Step
17
Seiorai
Member since:
Mar 2011
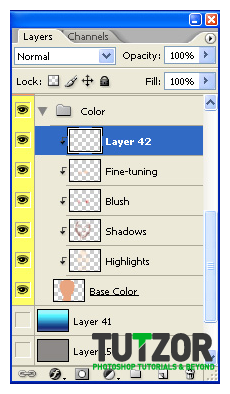
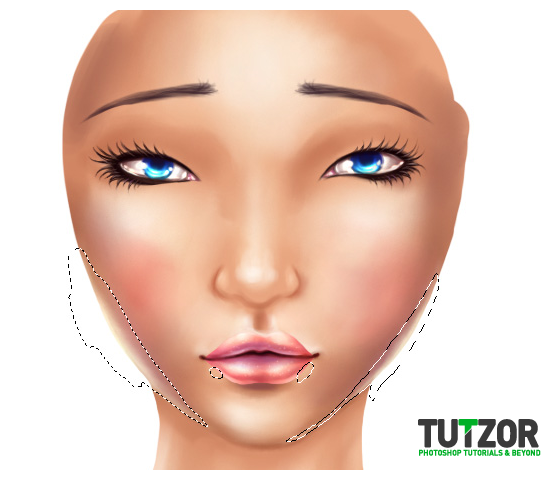
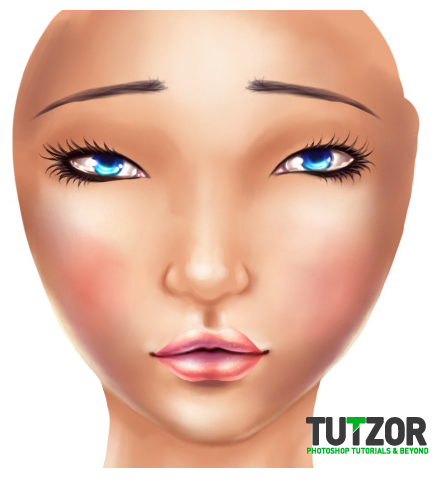
It's safe to Group all 3..or whatever...Lips-related layers in one larger Group named "Lips". This is to help tidy up the layers palette, hahahaha :D Okay, we're totally done with the lips themselves now :) Now that our face..or..her..face...is a bit more "filled" let's go back to finalizing the face shading, shall we? So. Make a new layer and move it between the "Shadows" clipping mask and the "Fine Tuning" clipping mask. Then set your brush to a large, 20-30px one and your Foreground color to something like #9c5a4c and brush around the edges of the face, so that the impression of 3D is achieved. Brush in the areas selected in Image 1 below--------> Then take the Smudge Tool and smoothen the thingy out, so that you get a similar effect to image 2 below---> Then you can merge this layer with the "Shadows" one.
Step
18
Seiorai
Member since:
Mar 2011
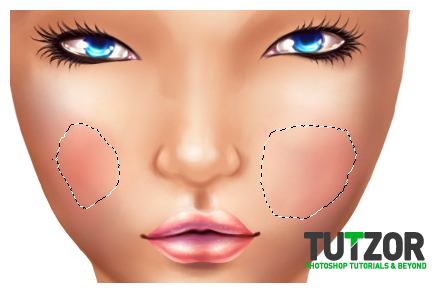
Create a new layer aove the "Shadows" one, this will be our blush layer :) Set your Foreground color to something like #ce5e5f and brush some blush (yea it rhymes hehe) in the selected areas in Image 1 below. Then use the Smudge tool to smoothen it out a bit. IMPORTANT! this blush layer must be under the "Fine Tuning" one! And you can name this layer "Blush" by the way. Step 19: Oki, now we'll create anew layer, make sure it is a Clipping Mask to the "Base Color" layer...then move it so that it is its topmost clipping mask, right baove the "Fine Tuning" layer. Like in image 1 below----> We'll use this layer to add more tuning to the skin between the lips and nose. So. Take a small, round brush and set your Foreground color to about #4d1814 then gently shade the corners of the lips. Switch then your Foreground color to #f8ddcb and paint just above the upper lip. See the animation in image 2 below for an example:
Step
19
Seiorai
Member since:
Mar 2011
Oki, now we'll create anew layer, make sure it is a Clipping Mask to the "Base Color" layer...then move it so that it is its topmost clipping mask, right baove the "Fine Tuning" layer. Like in image 1 below----> We'll use this layer to add more tuning to the skin between the lips and nose. So. Take a small, round brush and set your Foreground color to about #4d1814 then gently shade the corners of the lips. Switch then your Foreground color to #f8ddcb and paint just above the upper lip. See the animation in image 2 below for an example:
Step
20
Seiorai
Member since:
Mar 2011
Merge the unnamed layer safely with the "Fine Tuning" one. Then create a new layer, above the Fine Tuning one, and make it into a Clipping Mask like we did before with the one we just merged. We'll use this methos several more times, so get used ot it xD Also, once your hand will be sure of itself and you'll have learned the basics of shading, you won't need Clipping Masks anymore, but we're doing it this way because I remember that these masks helped em a lot when I was starting out :) Right, what was I saying? Oh yea. We just created a new layer yes? Okay, good. Set your Foreground color to #feeed0 and shade gently in the areas selected below. What we're doing now is basically adding that "glow"...that.."reflection" which real skin has, so that it starts to look realistic. See image 1 below for where to shade. See? Just the margins of the face, those which give off reflection of light in real life--------> Of course feel free to smooth out by smudging afterwards, so that you get a result similar to this in image 2 below----> You can merge it with the "Fine Tuning" layer after :)
Step
21
Seiorai
Member since:
Mar 2011
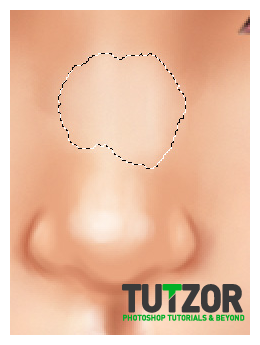
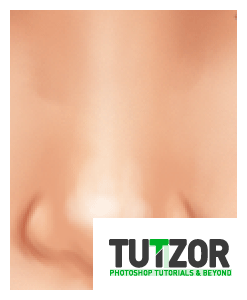
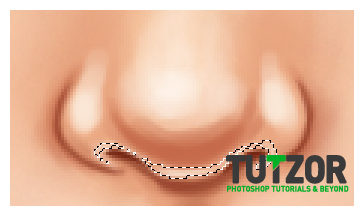
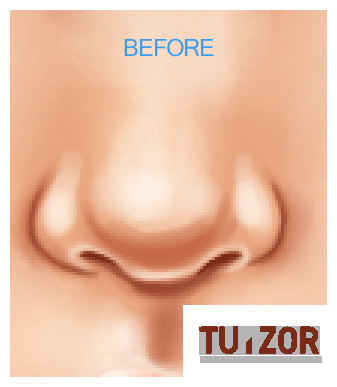
Let's focus on the nose now. Create a new layer above the Fine Tuning one, make it inot a clipping mask as well and setting your Foreground color to #fbebdc take your brush at a size of about 20px and add some skin highlights around the "root" of the nose. See image 1 below--------> Then look at the sketch: see the shape of the nose? We need to add more highlight to the outer nostrils, and then start adding shadow on the "under" side of the nose. Like in the animation in image 2 below (shadow is added with the color #c46748) --->
Step
22
Seiorai
Member since:
Mar 2011
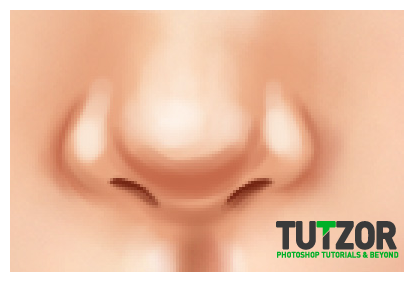
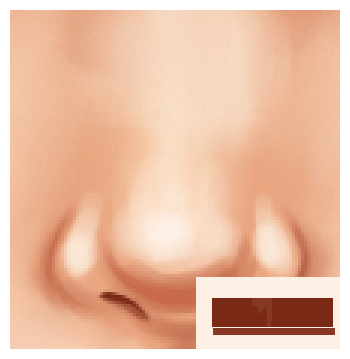
Now let's focus on the nostrils. Set your Foreground color to #71210f and following the sketch shape, fill in the two nostrils with color. ------------------->Tip: The more "inside" you go, the darker color you should use. The more "outside" the nostril you go, the lighter tones use. Like in Image 1 below: Then set your Foreground color to a lighter brown, say...#bc6844 ...and then shade the "shape"..the "outlines" of the nose. Like in animation in image 2 below----->
Step
23
Seiorai
Member since:
Mar 2011
Right. Remember now that skin glossiness? Time to put it to work ^___~ So. Set your Foreground to something like #f2bf9f and draw the highlights in the areas selected in image 1 below----------> Then take the same #893a24 shadow color we used in the previous step and add the final shadows and touches to the nose's shape. See animation in image 2 below for details :) You can merge the layer with the nose with the "Fine Tuning" layer if you want :)
Step
24
Seiorai
Member since:
Mar 2011
DA POWAH OF FRECKLEEEES! RAWR! Hehe, now we'll set our color to #f78d4d, and on a new clipping mask above the "Fine Tuning" layer we will draw freckles ^^ But not anyhow! Set your brush to a hard, round, 4px sized one and give it these settings:
Step
25
Seiorai
Member since:
Mar 2011
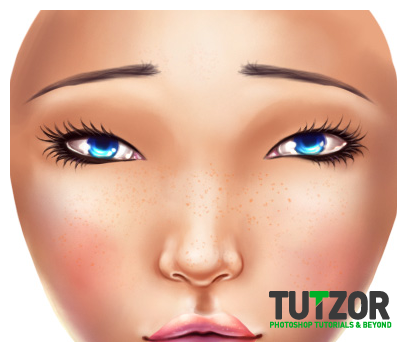
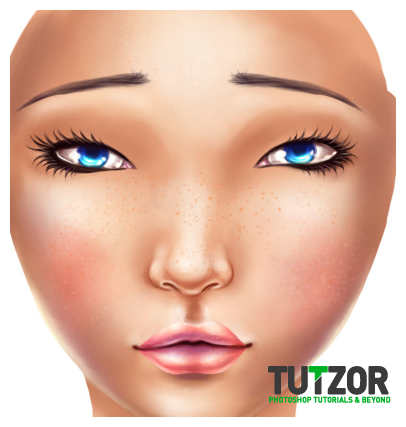
Now you can name that newly creates clipping mask laye "Freckles" and start painging on it :) Insist in the around-the-nose area, like in real freckles. So that you get a result similar to image 1 below: Next, using the same brush, with the same settings, create a new layer and move it inbetween the freckles one and the fine tuning one. This is the layer where we'll add skin texture. Set your Foreground color to #fadece and start brushing around gently, so that you get a similar result with image 2 below---> See the subtle skin texture? Especially visible on the outer sides of the face. Also: lower the opacity of this layer as needed. You can merge this layer with the Fine Tuning one if you want.

Comments

Comments

11
Jul'11
Clipping Path

Re: Digital Painting Tutorial

Great painting work in photoshop. Like it.

31
May'11
SEO Sheffield

Digital Painting tutorial

Not just a wonderful tutorial but also a wonderful artwork. Every detail counts.

09
May'11
Clipping Path

Re: Digital Painting Tutorial

Good artwork. The tutorial steps are really well explained.Thanks.

02
May'11
ice

Re: Digital Painting Tutorial

Part 2 is still working progress. Since it is a very complex and involve a lot of steps, we are breaking it into multiple tutorials. Please understand, it takes a lot of time and efforts to create each tutorial. :)
Stay tuned for the rest of the tutorials.

02
May'11
SammySamxx3

Re: Digital Painting Tutorial

Where is part two?